


Hello my fellow geeks ! This blog post will help you install FLARE-VM ! Whether you wanna bust malware or reverse your favorite gaming application, FLARE-VM has all tools you would need for your reverse engineering endeavors.
What is FLARE-VM?
FLARE-VM (FireEye Labs Advanced Reverse Engineering Virtual Machine) is like the Swiss Army knife of malware analysis environments. It’s a collection of software installation scripts that transform your Windows VM into a reverse engineering powerhouse.

Where Can FLARE-VM Be Used?
FLARE-VM is perfect for:
- Malware Analysis: Dissect malicious software and understand its inner workings.
- Reverse Engineering: Decompile and analyze binaries to see what makes them tick.
- Cybersecurity Research: Stay ahead of the latest threats by analyzing new malware.
- Training and Education: Perfect your skills in a controlled, virtual environment.
Requirements
Before we dive into the installation, let’s make sure our VM is ready for action. Here’s what you’ll need:
- Windows 10 or later
- PowerShell 5.0 or higher
- At least 60 GB of disk space and 2 GB of RAM
- A username without spaces or special characters (because who needs the drama?)
- An internet connection (duh)
- Tamper Protection and any anti-malware solution (like Windows Defender) disabled
- Windows Updates turned off
Note : Some windows 11 versions break while installing FLARE-VM , recommended OS is Windows 10 PRO .
Installation Guide
Step 1: Prepare Your VM
First, install Windows on your virtual machine. Grab a Windows 10 ISO from Microsoft’s website. I will be using virtualbox to create a Windows VM . Make sure you choose Windows Pro / Enterprise , otherwise you won’t be able to install Flare-VM . A basic virtualbox VM installation guide can be viewed here .
– Daddy Geeky
Dad Joke Break: Why don’t programmers like nature? It has too many bugs.
Step 2: Download the Installation Script
After installing your windows VM , open PowerShell as an administrator and download the FLARE-VM installation script:
(New-Object net.webclient).DownloadFile('https://raw.githubusercontent.com/mandiant/flare-vm/main/install.ps1',"$([Environment]::GetFolderPath('Desktop'))\install.ps1")
– Daddy Geeky
Dad Joke Break: Why do Java developers wear glasses? Because they don’t C#.
Step 3: Unblock the Installation Script
PowerShell can be a bit overprotective, so let’s unblock the script:
powershell:
Unblock-File .\install.ps1Step 4: Set Execution Policy
Enable script execution so PowerShell can do its magic:
powershell:
Set-ExecutionPolicy Unrestricted -Force

Step 5: Disable Microsoft Defender Antivirus
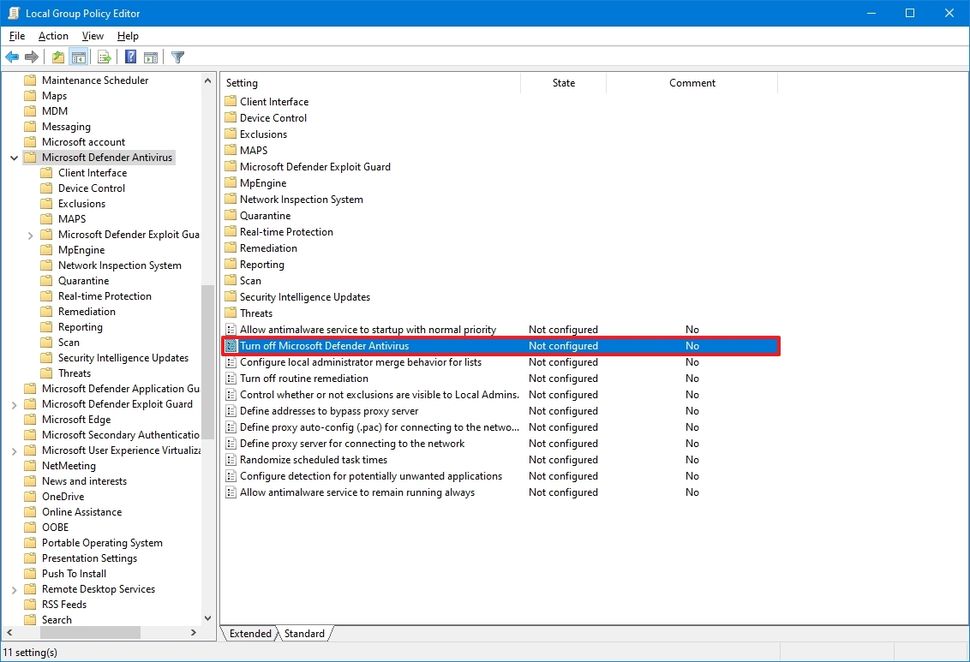
To disable Microsoft Defender Antivirus permanently on Windows 10, use these steps:
- Open Start (win key + r).
- Search for gpedit.msc and click the top result to open the Local Group Policy Editor.
- Browse the following path: Computer Configuration > Administrative Templates > Windows Components > Microsoft Defender Antivirus
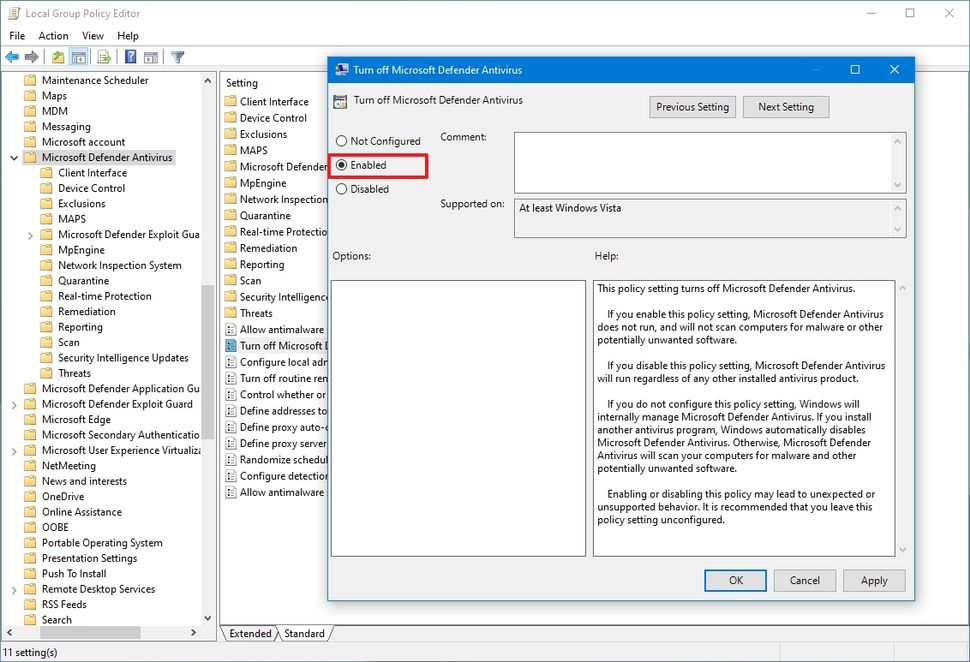
- Double-click the “Turn off Microsoft Defender Antivirus” policy.
- Select the Enabled option to disable Microsoft Defender Antivirus permanently.
- Click the Apply button.
- Click the OK button.
- Restart your computer.
Make sure to disable Windows Updates and any anti-malware software. We don’t want any surprises mid-installation!

Don’t forget to take a VM snapshot before running the script !

Start the installation with script :
./install.ps1
Now this can take a ton of time (~60 GB of tools and scripts) . Your VM will restart a few times and resume its installation automatically . It is normal 😉 . After the installation is complete you will see a nice Flare-VM wallpaper .Use the >> to select all tools or > to select your favorite ones . Click OK .

You can delete the installation executables (.msi , .exe files) from the TOOLS folder . Don’t delete the actual program executables ! Sometimes the installation may seem stuck , just press enter on the powershell console to resume the installation logs .
There you have it ladies and gents ! A fresh windows RE environment . Take a snapshot of this fresh installation and get g-RE-eky .

Comment below your plans with this overloaded VM .

